I'm now blogging at http://craftingandcardigans.blogspot.com
Please follow me there!
Friday, September 9, 2011
This blog has moved
Wednesday, September 7, 2011
Flavor of the Week (with a tutorial!)
I have a new obsession, folks.
Wreaths. To be specific, yarn wreaths.
They're inexpensive, not too hard to make and completely precious! Just look at some of my favorites from Pinterest!


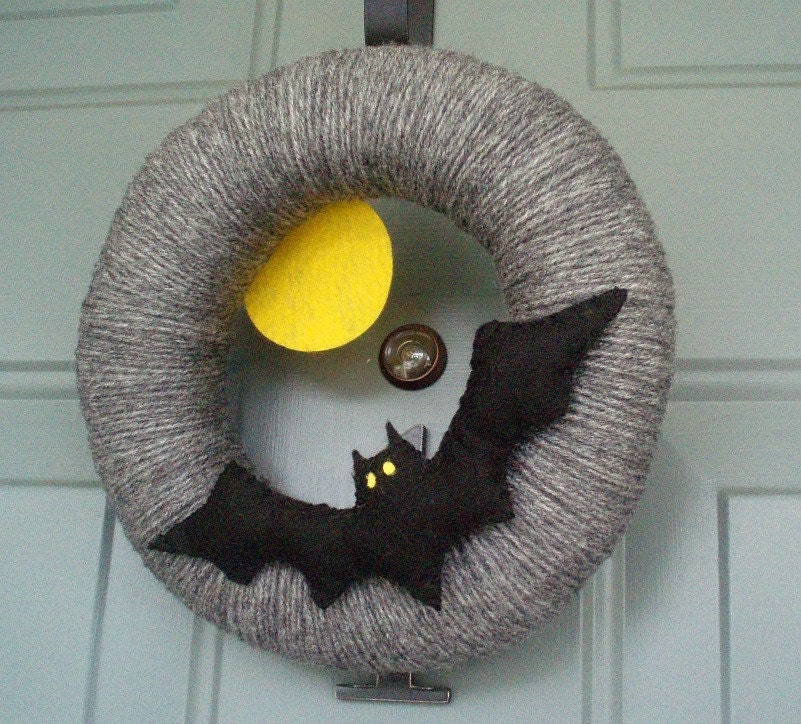
I have definite plans to make the American flag, candy cane and Halloween wreaths and I already tried my hand at the argyle wreath (because you know I love me some argyle) a couple weeks ago. Take a look.

I'd say the hardest parts of the project were picking out my color scheme and cutting out the diamonds. I learned that night that I am AWFUL at drawing and subsequently cutting out both diamonds and triangles. I'm also awful at taking tutorial pictures. But here's what I did...
Argyle Yarn Wreath Tutorial
What you will need:
Yarn
Felt to make diamonds
Foam wreath form (or plumbing tubing formed into a circle and duct taped in place)
Cardstock (for making diamond stencil)
Push pins
Glue (hot, super, tacky, fabric...choose your weapon)
Ribbon
What to do:
1. Choose your color scheme. I chose charcoal gray, heather gray and that bright, sunny yellow. Happily, I have leftovers I can use on the Halloween wreath.
2. Tie one end of the yarn around the wreath and secure with a knot, then wrap the entire thing until it's all covered without any holes. I took my time so that I wouldn't have to do second layer. Tie a knot at the end.
3. Cut out your diamonds. Like I said before, I'm awful at drawing and cutting. So I folded a piece of cardstock in half and drew a small triangle. Then I cut it out, unfolded it, and had a diamond. I used that triangle to trace the rest of my diamonds, half yellow and half gray.
4. Pin your diamonds to the wreath where you want them. This helps to prevent them from going all over the place.
5. Wrap your yarn around the wreath once more to create the criss-cross pattern. Do one diagonal first and then the other.
6. When everything looks the way you want, remove the pins and use glue to permanently secure the diamonds.
7. Loop a ribbon around the top so you'll have something to hang it by. I still haven't done this to mine but plan to...someday...
Sources:
https://blogger.googleusercontent.com/img/b/R29vZ2xl/AVvXsEgqSlq_LJrMx1y3lkeMHVqYVPR9zeN8pxCqrWq7uYzLMfbVmSfEkKLaaVFvxT8gtYMzgBlXR5g57vChSZEdTOdcjKIzUtr-mYlOG4KimAlF3Cd71JPGI2SjwLfml3oD1KgJEApMKxmQHBU/s1600/IMG_9198.JPG
https://blogger.googleusercontent.com/img/b/R29vZ2xl/AVvXsEi87dUQxFDLhLfnPtP5dwloxuE9-o-UDTarkxbthLuDsWDHWWUdkscXiDPUpzB8AwryVVC2HX12TFPwR5A1cQ-LteFSsHzX-1-urDADxCQMNzFOQSTbpxD2niVKmbitxLJVymvP4tSmxJ99/s1600/010.jpg
http://ny-image2.etsy.com/il_fullxfull.171564218.jpg
https://blogger.googleusercontent.com/img/b/R29vZ2xl/AVvXsEjuXT6leMXG4m-HaEMf28_jnOLR5peojuJgCe-DtfB6ed5b30hpS8laG6b3DXVMsOR2LlNxThU0lk2P48Mxb17jr24YqkZLSmDcCUX9YFAcg6kCaWU2p-2DO_rb6OOig2BYVjzLsXp9gzo/s320/knockknocking+hostess.jpg
http://ny-image3.etsy.com/il_170x135.210243019.jpg
Thursday, September 1, 2011
Blast from the Past
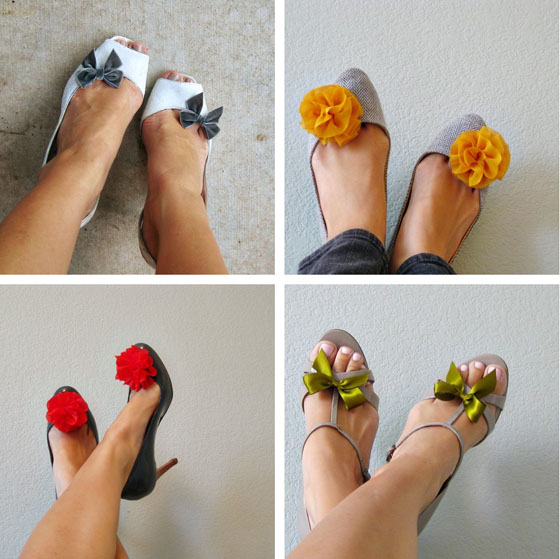
I was perusing Pinterest on my phone just now and one of the first items I saw was shoe clips. I guess I'd seen them before but I forgot about them. Basically, you just clip the little bow, flower, whatever, on your shoe to jazz them up a little.

Cute, right? But this post is not about shoe clips. This post is about what shoe clips made me think of...

Thank you Pinterest for this little walk down memory lane. Did you have bow biters when you were a kid? Did you love them as much as I did (and still do)?
Subscribe to:
Posts (Atom)

